How to prune

25 Jul 2005 | 5 min read
Pruning is not difficult, but there are some good techniques to bear in mind.
Irrespective of what you prune, keep all your cuts clean and snag free, and as small as possible. Avoid steep angle cuts which unnecessarily increase the surface area. Cut straight or on a gentle angle to make a circular wound.
Pruning with secateurs (for stems up to 1.5cm thick)
 Always cut to just above a healthy node, where new growth will emerge. A node is the 'knuckle' like point in a stem where buds are produced. If you prune leaving a large amount of bare stem above a node or bud, you'll be left with a stumpy bit of stem that nothing grows from. This will die back and may even die back into the healthy growth below the bud.
There are two main patterns of bud layout on stems and these dictate how to prune the plant: opposite and alternating.
Pruning to an alternate bud Make a gently sloping cut roughly 5mm above the healthy bud, with the lower point of slope on the opposite side of the stem to the bud. Always select a bud facing outwards from the plant to prune to, as you don't want the new growth congesting the plant as it develops.
Pruning to opposite buds Make a flat cut just above the healthy node, so that you don't damage the developing buds on either side. If you think one of those buds will eventually grow into the plant and cause congestion, rub the bud off gently with you thumb in an upwards direction.
 Pruning with long-handled pruners or 'loppers' (for stems up to 3cm thick)
Use the same pruning technique. WIth these tools you can prune slightly thicker branches, as the the long handles provide extra leverage. Don't be tempted to cut branches that are thicker than 3 cm, as you should use a pruning saw to cut these.
Pruning with pruning saws (for all other sizes)
If pruning thick or deadwood (which is tougher than live wood), you will need to use a pruning saw. The two main saw techniques are 'under-cutting' and 'target pruning'.
Under-cutting Using under-cutting will help avoid irreparable damage to trees and shrubs when removing larger branches.
Remove the branch in small sections that can cut back comfortably and safely. Each section cut off will reduce the overall weight of the branch, preventing the branch snapping.
 Then under-cut the branch by a quarter of the width. This will ensure that the bark won't to be torn off when the branch is removed. If you try to cut upwards by more than a third, you'll find that the weight of the branch pressing downwards will close the cut around the saw blade, pinching it and making cutting extremely hard work.
Once you have finished this first cut, then make the second cut from above the branch so that the cuts do not line up perfectly. Leave 5cm more branch with the top cut. This allows the branch to support its weight until you are ready to saw the final strokes in a controlled action.
Now when you reach a short distance from the trunk, for example 30cm you know you will be able to safely support, take hold of the stem and use the next technique explained below.
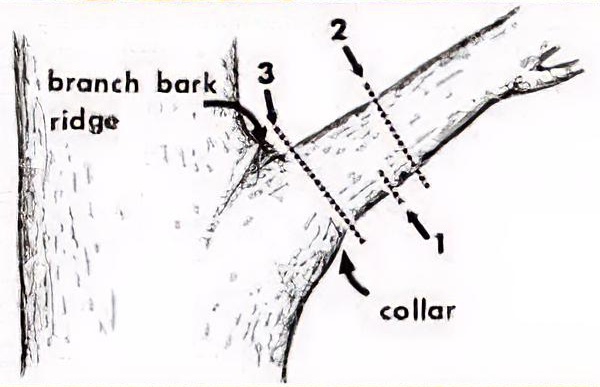
Target pruning 'Target pruning' mimics how trees naturally respond to branch loss.
Where a branch meets the stem, there will always be two distinct features: The 'branch bark ridge'  and the 'branch collar'. This may be more or less visible depending on the species of tree. The branch collar is the widened growth at the very base of the branch and the bark ridge runs from the trunk over the top, between the collar and the trunk. It is important than neither of these are damaged or removed with the branch as they produce the callusing growth that heals over the wound.
The final cut to remove the branch should be clean and just outside the swelling of the branch collar. The angle of cut will roughly be a mirror image of the branch bark ridge, but not so angled that the size of the wound is enlarged. If there are any tufts or snags of wood or bark, cut these off with a sharp, clean pruning knife, taking care not to enlarge the wound.
Top ten pruning tips:
- Always prune out the three D's first (dead, diseased and dying growth), before working further.
- Whether left of right handed there are secateurs to suit everybody. Before buying, make sure you've tried several pairs for the best fit.
- Don't put it off! Pruning older stems makes larger, slower-healing wounds, whereas young stems heal quickly and easily. Start pruning and training plants as soon as possible to avoid increasing damage later.
- Use caution when cutting existing ties from wall shrubs, especially for thorny roses. The stems can be under great tension and spring outwards unexpectedly. A good pair of safety glasses will be your best protection.
- Sharp tools are safer. Struggling with blunt tools cause accidents. As well as periodic sharpening, treat your tools to a wipe over with an oily rag after use and if you have been pruning diseased material use a garden approved disinfectant.
- Wound paints are now proven to be non-beneficial. They seal in pathogens in a controlled, moist enivronment. Make the cleanest pruning cut you can, then leave the plant to heal itself naturally.
- Deadwood is always tougher than living plant material. Switch to a pruning saw rather than secateurs to keep things easy for you.
- When removing branches, always reduce the weight gradually, rather than in one go. If a complete branch drops expectedly it can tear bark off the plant, or worse still, injure you or someone else.
- Think twice, then cut once. Take your time and imagine how the plant will look from all angles before you snip.
- Before pruning dense bushes or hedges, keep a watchful eye out for nesting birds. Avoid cutting between March and August, which is when birds are nesting, and if necessary delay trimming until the young have flown